Winter Weather in Lofoten
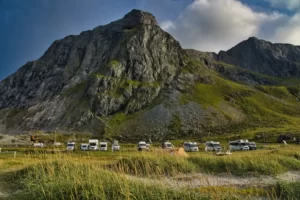
Let’s start with the biggest misconception: visiting Lofoten between October and March does not mean you’ll be walking through a winter wonderland with guaranteed snow. Sorry to disappoint, but that’s not how it works here.
Lofoten sits right in the middle of the Gulf Stream, which means our climate is mild compared to other places on the same latitude. In practice, this means that winter temperatures usually hover around 0°C—sometimes a few degrees above, sometimes a few below.
So what happens? This:
- It snows.
- Then it rains, the snow turns into sleet and slush.
- The temperature drops below zero, all that slush freezes into ice.
- Then we get fresh snow on top of the ice.
- Then it warms up again, it rains, it melts…
- And the cycle repeats.
Sometimes these changes happen over weeks. Other times you get all of it in just a couple of days—or even in a single day.
The result? Hiking conditions are impossible to predict long in advance. A mountain where you might have needed snowshoes three days ago may require crampons today. A slope that was avalanche-safe last week might be dangerous now. The same trail can be a pleasant walk on one day, and nearly impossible the next.
So when you ask me in December: “What will the trail to Ryten be like in February?”—the honest answer is: I don’t know. Nobody knows. You’ll only know once you’re here, checking the latest conditions and forecasts.
Do we understand each other?
Daylight Hours
Another thing people often underestimate in Lofoten winter: daylight.
Let’s take Ryten as an example. Ryten is one of the locals’ winter favorites thanks to its moderate slope (not avalanche-prone) and those jaw-dropping views over Kvalvika Beach. It’s also the mountain we guide most often in winter—we’re up there one to four times a week—so trust me, we know what it takes.
In winter, you should expect about 3 hours up to the summit (depending on your fitness, weather, and snow conditions), and another 2 hours down. That’s already a five-hour round trip.
- In March, no problem. You’ve got plenty of daylight, you can take long breaks, shoot all the photos you want, and still get back down safely in daylight.
- In December, totally different story. You’ve only got around 4 hours of usable daylight. That’s less than the time you need for the whole hike.
This means two things:
- You need to be strict with your timing. If you’re slow, or if conditions are tougher than expected, you might not make it up and down before dark.
- You need a proper headlamp. Not your phone flashlight (please, no). A powerful, fully charged headlamp. We’ve seen way too many people trying to make it down the icy, sloping section to Innersand parking with just their phone as a torch—it’s dangerous.
And then there’s the weather. Whiteouts are common here. Whiteouts in darkness? That’s a nightmare scenario, especially if you don’t know the terrain and the trail is covered by snow.
So here’s the brutal truth: you need to keep track of time. If you’re too slow, if the weather turns, or if daylight is running out—turn around. The mountain isn’t going anywhere.
Avalanche Basics for Winter Hiking in Lofoten
Now let’s talk about something serious: avalanches.
The mountains in Lofoten are steep. Like really steep. Many of them are completely unclimbable even in summer—so you can imagine what they’re like when covered in snow and ice in winter.
Here’s a simple rule of thumb: any slope steeper than about 30° is avalanche terrain. That means if you’re looking up at a mountain and it looks steep… well, chances are it is steep enough to trigger avalanches.
This is why you can’t just pick any random peak on a map and decide to “go for a winter hike.” The terrain here doesn’t work like that. You need to carefully choose mountains that are safe for winter hiking.
You’ve basically got two options:
- Trust me and follow the recommendations further down in this article. These are the hikes that locals actually do in winter and that we guide our guests on.
- Learn how to evaluate avalanche terrain yourself. That means checking the official avalanche forecast (Varsom.no), looking at avalanche terrain maps, and knowing how to recognize risky slopes, and to perform self-rescue in case disaster should strike. If you don’t already have that knowledge, winter in Lofoten is not the time to start experimenting.
Avalanches here are not some theoretical danger—they happen every winter (and spring!!!), and they are deadly. So don’t gamble with your life for a photo. Choose wisely.
Trail Conditions for Winter Hiking in Lofoten
Let me set your expectations straight: even in summer, hiking in Lofoten is not like hiking in the Alps or in North America. Our trails are rough, rocky, and often steep. Trail marking is minimal to non-existent. There are no mountain huts, no staffed cabins, no prepared trails, no “trail guardians.” In winter, all of this gets amplified.
Sometimes you’re lucky and there’s a track from hikers before you. Sometimes there isn’t, and you’ll be the one plowing through knee-deep snow. Even on Ryten—the most popular winter hike in western Lofoten—we often end up breaking the trail, because we’re usually the first ones to head up in the morning.
And here’s the catch: just because there’s a track doesn’t mean it’s the right one. We know where to go, but imagine you’re blindly following footprints left by someone who had no idea what they were doing. You can easily get yourself into trouble that way.
Another important point: winter trails don’t always follow summer trails. Ryten is again the perfect example.
- In summer, the “normal” path goes through a rocky section where you need to use your hands and scramble a bit, with some chains bolted into the rock.
- In winter? That section is a nightmare, especially in snowshoes. Please don’t even try it. (And definitely don’t try it in snowshoes you rented from us—you’ll most likely destroy them.)
- Instead, in winter there’s a different, less steep path that makes far more sense.
But here’s the problem: your average hiking app or summer map doesn’t show that winter alternative. Which is exactly how people end up in the wrong place when the terrain is covered in snow.
So, bottom line: don’t blindly trust maps or footprints. Winter conditions change the game completely, and you need to adjust your expectations accordingly.
Essential Equipment for Winter Hiking in Lofoten
As I wrote earlier about the changeable weather: you can’t just head into the mountains in Lofoten in winter with regular hiking boots and optimism. Without the right equipment you’ll either exhaust yourself, end up on your butt, or put yourself in real danger. The basics you need to think about are snowshoes, microspikes, crampons, hiking poles, and a headlamp.
So, when do you use what? It depends entirely on the terrain and the snow or ice conditions on that day:
Snowshoes
Use snowshoes when there’s deep, soft snow. Without them, every step you take will sink down, and hiking becomes an energy-draining nightmare. Snowshoes spread your weight over a bigger surface and make it possible to move forward without burning out after 200 meters.
Microspikes
And by microspikes I mean real mountain hiking microspikes—not those flimsy plastic ones you find online. Those are a joke. They don’t give you the traction you need, they break easily, and when the little plastic teeth fall off, we end up picking them up from the trail later. They’re bad for the environment and worse for your safety.
Proper microspikes for mountain hiking are made with steel chains and teeth. These are what you’ll use for most winter hikes in Lofoten, because ice is everywhere—from frozen ground to steep, slippery sections. If you take one piece of advice from me, let it be this: bring good microspikes.
Crampons
Think of crampons as microspikes on steroids. They’re meant for serious climbing expeditions, steep ice, and technical mountaineering. Unless you already know how to use crampons, you don’t need them. In fact, if you’re new to winter hiking, you’ll most likely injure yourself trying. Just acknowledge they exist and leave them to the climbers.
Hiking Poles
Poles can be really handy in winter—they help you keep balance, especially on descents or when crossing icy sections. Whether you use them or not is up to personal preference, but here’s what usually happens on our guided tours: in the beginning, people are like “nah, I don’t need poles.” Then, on the way down, suddenly everyone wants one of the extra pairs we carry. Trust me, they make life a lot easier.
Headlamp
We’ve talked about daylight hours already, but let me say it again: a headlamp is non-negotiable in the dark months. From November through early February you will need one—it’s pitch dark before you know it. By March and April you might get away without it, but in mid-winter, it’s a must. And not just any headlamp: a powerful one, fully charged before you leave. Do not rely on your phone flashlight. Please.
Clothes for Winter Hiking in Lofoten
Last but not least, let’s talk about clothing. I’ll keep this brief, because honestly, I could write a whole book about how to dress for winter hiking in Lofoten. But here are some of the biggest audacities we’ve actually seen out there—either on our own clients, or on random people we’ve met on the trail:
- People wearing thick parkas. Yes, they look warm, but you’ll sweat like crazy once you start moving uphill. And when sweat meets wind in Lofoten? You’re in trouble.
- People wearing sneakers or moccasins. On snow and ice. Enough said.
- People wearing jeans. Wet jeans in the Arctic winter are basically a personal torture device.
- People wearing two pairs of jeans (because, hey, “layers,” right?). Spoiler: that’s not how layering works.
- People with a fanny pack instead of a backpack, claiming they have “everything they need” (aka wallet and phone).
So, what should you actually wear?
- Base layer: wool or technical fabric, never cotton.
- Mid-layer: fleece or wool to keep the warmth.
- Outer layer: windproof and waterproof jacket + pants.
- Accessories: gloves or mittens, a warm hat, and a buff or balaclava to protect your face from wind.
- Shoes: proper insulated, waterproof hiking boots with ankle support.
Think in layers so you can regulate your body temperature as you move. You’ll warm up fast going uphill, and cool down just as fast when you stop. The trick is to avoid sweating too much, because once you’re wet, the cold will hit you hard.